Chicago-Style Bakery Apple Slices
Chicago-Style Bakery Apple Slices
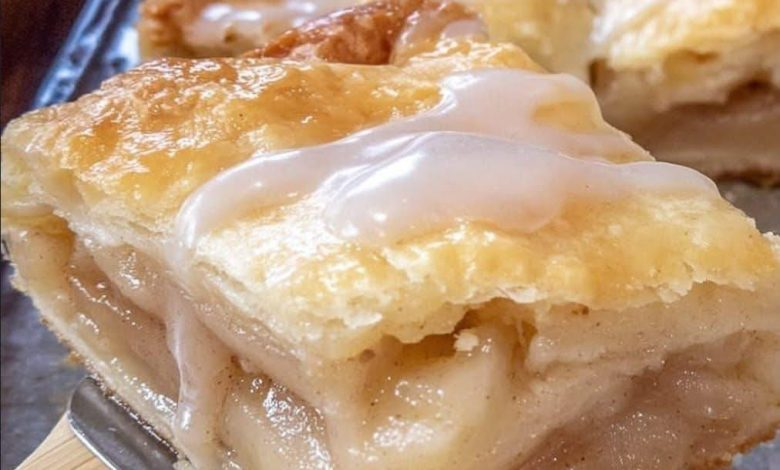
Bring the taste of a traditional neighborhood bakery into your kitchen with these delicious Chicago-Style Bakery Apple Slices. This classic dessert features layers of tender, flaky homemade pastry surrounding a sweet apple filling, all finished with a smooth vanilla glaze.
Unlike a traditional round apple pie, this nostalgic Midwest favorite is baked in a rectangular pan and sliced into generous squares. The buttery crust provides the perfect contrast to the soft, cinnamon-kissed apple filling, while the sweet glaze adds a delightful finishing touch.
One special trick makes this pastry particularly delicious: grated cold butter. Incorporating finely shredded butter into the flour creates delicate pockets throughout the dough, helping produce a beautifully flaky crust.
Perfect for holiday gatherings, bake sales, afternoon coffee, or sharing with family and friends, these bakery-style apple slices are a wonderful homemade treat.
Ingredients
For the Flaky Pastry Crust
- 4 cups all-purpose flour
- 1¼ cups unsalted butter, chilled and grated (2½ sticks)
- ½ cup ice water, plus additional if needed
- 1 tablespoon granulated sugar
- 1 teaspoon salt
For the Apple Filling
- 4 cups apple pie filling
For the Vanilla Glaze
- 1 cup powdered sugar
- 2 tablespoons unsalted butter, softened
- 2 tablespoons whole milk
- 1 teaspoon vanilla extract
Instructions
Step 1: Prepare the Grated Butter Dough
In a large mixing bowl, combine the all-purpose flour, granulated sugar, and salt. Whisk the dry ingredients together until evenly distributed.
Using a box grater, shred the cold butter directly into the flour mixture. Gently toss the grated butter with the flour as you work to keep the pieces separated and evenly coated.
The butter should remain cold throughout this process. If it starts becoming soft, place the bowl in the refrigerator or freezer for a few minutes before continuing.
Step 2: Add the Ice Water
Make a small well in the center of the flour and butter mixture. Gradually pour in the ice water, using a fork to bring everything together.
Continue mixing until a rough, slightly crumbly dough begins to form. If the mixture seems too dry, add additional ice water one tablespoon at a time.
Avoid overworking the dough. Divide it into two equal portions and shape each into a flat rectangle. Wrap both portions in plastic wrap and refrigerate for at least 30 minutes.
Step 3: Prepare the Pan and Assemble the Bottom Crust
Preheat your oven to 400°F (200°C).
Lightly grease a 9 × 13-inch baking pan. Remove one portion of chilled dough from the refrigerator and place it on a lightly floured surface.
Roll it into a rectangle large enough to cover the bottom of the pan. Carefully transfer the pastry into the prepared dish, gently pressing it into the corners.
Spread the apple pie filling evenly over the bottom crust, leaving a small border around the edges.
Step 4: Add the Top Pastry Layer
Roll out the second portion of chilled dough into a rectangle approximately the same size as the first.
Carefully place it over the apple filling. Bring the edges of the top and bottom crusts together and pinch them firmly to seal.
Trim away any excess pastry if necessary, making sure the filling remains enclosed.
Step 5: Vent and Bake
Using a sharp knife, cut several small slits across the top crust. These openings allow steam to escape during baking and help prevent the pastry from becoming soggy.
Place the pan in the preheated oven and bake for approximately 40 minutes, rotating the pan halfway through for even browning.
The pastry should develop a rich golden-brown color and look crisp around the edges.
Remove from the oven and transfer the pan to a wire rack. Allow the apple pastry to cool completely before adding the glaze.
Step 6: Prepare the Vanilla Glaze
In a medium bowl, combine the powdered sugar, softened butter, milk, and vanilla extract.
Whisk until the mixture becomes smooth, creamy, and easy to spread. If the glaze is too thick, add a few drops of milk. If it’s too thin, incorporate a little more powdered sugar.
Step 7: Glaze and Slice
Once the pastry has cooled completely, spread the vanilla glaze evenly across the top.
Allow the glaze to rest for approximately 20 minutes, or until it begins to set.
Using a sharp knife, cut the pastry into squares or rectangular bakery-style portions.
Serve and enjoy!
Helpful Tips for Perfect Bakery-Style Apple Slices
- Keep the butter cold: Cold grated butter is essential for creating a flaky, layered pastry.
- Avoid overmixing: Work the dough just until it comes together to prevent a tough crust.
- Chill before rolling: Refrigerated dough is easier to handle and holds its shape better.
- Seal the edges carefully: This helps prevent the apple filling from leaking during baking.
- Cut steam vents: Small openings in the top crust allow moisture to escape.
- Cool before glazing: Applying glaze to warm pastry can cause it to melt and run off.
- Use a sharp knife: Clean cuts give the finished slices a neat bakery-style appearance.
Easy Variations
You can customize these apple slices with a few simple additions:
- Cinnamon Apple: Sprinkle ground cinnamon over the apple filling for extra warmth.
- Caramel Apple: Drizzle caramel sauce over the filling before adding the top crust.
- Nutty Crunch: Add chopped pecans or walnuts to the apple layer.
- Extra Vanilla: Add a little additional vanilla extract to the glaze.
- Spiced Apple: Mix a pinch of nutmeg or apple pie spice into the filling.
Serving Suggestions
These homemade apple slices are delicious served:
- Slightly chilled with a cup of hot coffee.
- At room temperature alongside tea.
- Warmed slightly with a scoop of vanilla ice cream.
- On a holiday dessert platter with cookies and brownies.
- As an afternoon treat with whipped cream.
Storage Instructions
- Room temperature: Keep covered for up to 1–2 days in a cool environment.
- Refrigerator: Store in an airtight container for up to 4–5 days.
- Freezer: Freeze individual unglazed slices in a freezer-safe container for up to 2 months. Thaw in the refrigerator and glaze before serving.
Final Thoughts
These Chicago-Style Bakery Apple Slices are a delicious reminder that some of the best desserts come from traditional homemade recipes. The combination of flaky, buttery pastry, sweet apple filling, and smooth vanilla glaze creates a treat that’s both comforting and wonderfully satisfying.
The grated butter technique gives the crust its special texture, while the simple rectangular presentation makes these slices easy to cut, serve, and share.
Whether you’re preparing a dessert for a family gathering, filling a holiday dessert table, or simply craving an old-fashioned bakery favorite, this recipe is sure to become a treasured addition to your collection!